Si vas a implementar el Membership Provider de ASP.NET con SQL Server, seguramente encontrarás mucha información en Internet de cómo hacerlo. La parte que no todo mundo explica es cómo crear las tablas que contendrán toda la información de nombres de usuario, contraseñas, roles, etc.
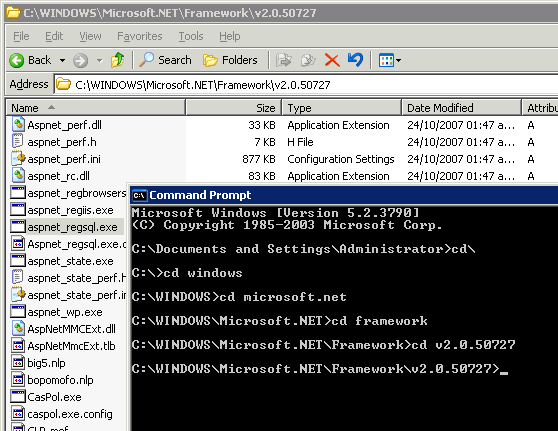
Las tablas se crean mediante la herramienta aspnet_regsql.exe que se encuentra en el directorio de la versión del Framework que estés usando (ejemplo: C:\WINDOWS\Microsoft.NET\Framework\v2.0.50727). Si usas la versión 3.5 tienes que usar la herramienta que viene en el fólder de la versión 2.
Abre una ventana de MS-DOS y cámbiate a dicho fólder:
La sintáxis de la herramienta es:
| Option | Description |
|---|---|
|
-? |
Prints Aspnet_regsql.exe Help text in the command window. |
|
-W |
Runs the tool in wizard mode. This is the default if no command-line arguments are specified. |
|
-C<connection string> |
Specifies the connection string to the computer running SQL Server where the database will be installed, or is already installed. This option is not necessary if you specify only the server (-S) and login (-U and -P, or -E) information. |
|
-S<server> |
Specifies the name of the computer running SQL Server where the database will be installed, or is already installed. |
|
-U<login ID> |
The SQL Server user ID to log in with. This option also requires the password (-P) option. This option is not necessary if you are authenticating using Windows credentials (-E). |
|
-P<password> |
The SQL Server password to log in with. This option also requires the user ID (-U) option. This option is not necessary if you are authenticating using Windows credentials (-E). |
|
-E |
Authenticates using the Windows credentials of the currently logged-on user. |
|
-sqlexportlonly<filename> |
Generates a SQL script file that can be used to add or remove the specified features. The specified actions are not performed. |
| Option | Description |
|---|---|
|
-Aall|m|r|p|c|w |
Adds support for one or more ASP.NET application services. Service identifiers can be specified together or separately. The following identifiers are used for ASP.NET application services: all – All services, including common tables and stored procedures shared by the services m – Membership r – Role Manager p – Profile c – Web Parts Personalization w – Web Events |
|
-Rall|m|r|p|c|w |
Removes support for one or more application services. Service identifiers can be specified together or separately. The following identifiers are used for ASP.NET application services: all – All services, including common tables and stored procedures shared by the services m – Membership r – Role Manager p – Profile c – Web Parts Personalization w – Web Events |
|
-Q |
Runs the tool in quiet mode and does not confirm before removing an application service. |
|
-d<database> |
Specifies the name of the database to create or modify for use with application services. If the database is not specified, the default database name of “aspnetdb” is used. |
Si necesitas más información, visita esta página.
En un caso sencillo, solamente necesitamos habilitar el Membership provider y el Role provider, por lo que nuestra sintáxis sería:
aspnet_regsql -S servidorsqlexpress -U usuario -P contrasena -A mr -d nombredelabasededatos
Donde:
-S va seguido del nombre de tu servidor, ya sea en tu red local o en Internet (usa la IP)
-U va seguido de tu nombre de usuario
-P va seguido de tu contraseña
-A va seguido de “mr” ya que queremos habilitar el Membership y Role.
-d va seguido del nombre de tu base de datos
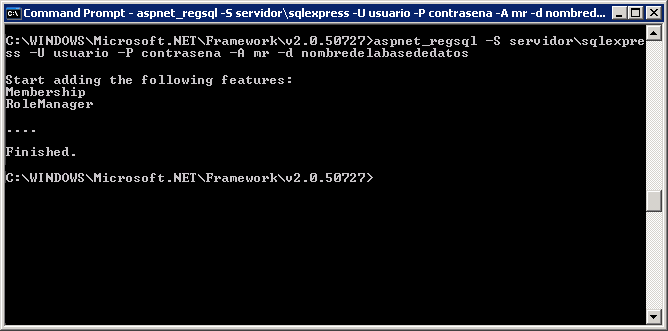
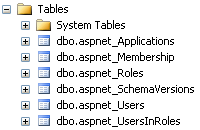
Listo, ahora solamente verifica que se crearon las tablas correctamente:
Actualización 2008-05-10
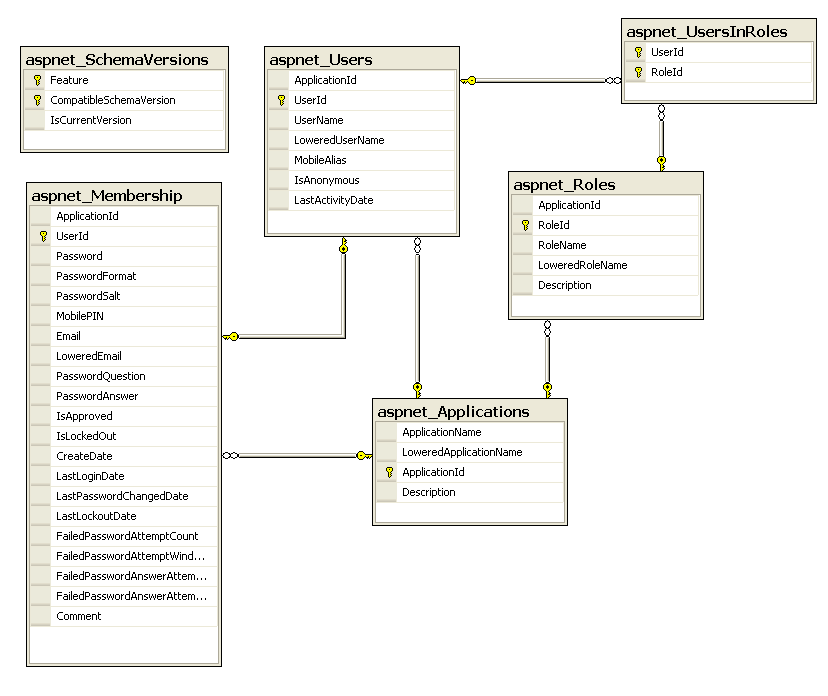
Para entender cómo están relacionadas las tablas entre sí, puedes revisar el siguiente diagrama:
El siguiente paso sería crear el connectionString en tu archivo web.config, ponlo bajo la sección configuration:
<connectionStrings>
    <add name="MiConnectionString" connectionString="Data Source=SERVIDORSQLEXPRESS;Initial Catalog=nombredelabasededatos;Persist Security Info=True;User ID=usuario;Password=contrasena"
    providerName="System.Data.SqlClient" />
</connectionStrings>
Y luego, bajo la sección system.web coloca lo siguiente:
<!--
    The <authentication> section enables configuration
    of the security authentication mode used by
    ASP.NET to identify an incoming user.
-->
<authentication mode="Forms">
<forms loginUrl="~/Default.aspx"
    name=".ASPXFORMSAUTH"
    timeout="300"/>
</authentication>
<roleManager
    defaultProvider="MiRoleProvider"
    enabled="true"
    cacheRolesInCookie="true"
    cookieName=".ASPROLES"
    cookieTimeout="30"
    cookiePath="/"
    cookieRequireSSL="false"
    cookieSlidingExpiration="true"
    cookieProtection="All">
        <providers>
          <clear/>
          <add name="MiRoleProvider"
            connectionStringName="MiConnectionString"
            applicationName="NOMBREAPP"
            type="System.Web.Security.SqlRoleProvider"/>
        </providers>
</roleManager>
<membership defaultProvider="MiMembershipProvider">
    <providers>
      <clear/>
      <add
        name="MiMembershipProvider"
        type="System.Web.Security.SqlMembershipProvider"
        connectionStringName="MiConnectionString"
        applicationName="NOMBREAPP"
        enablePasswordRetrieval="false"
        enablePasswordReset="true"
        requiresQuestionAndAnswer="true"
        requiresUniqueEmail="true"
        passwordFormat="Clear"/>
    </providers>
</membership>
Con esto le indicas a tu aplicación que utilice para la autenticación la base de datos que creaste al inicio.
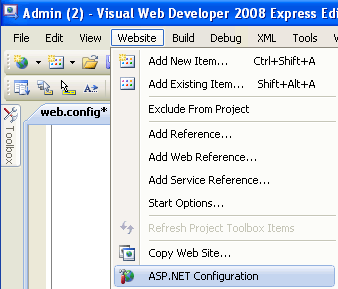
Ahora, para crear usuarios y roles utiliza la herramienta que viene incluida con Visual Web Developer 2008, haz clic en Website -> ASP.NET Configuration:
Esto abrirá una ventana de tu navegador y podrás ver la página administrativa en la que puedes crear roles, usuarios y asignar esos usuarios a los roles que desees. Esta página administrativa, para conectarse a la base de datos, utiliza los valores establecidos en el web.config.
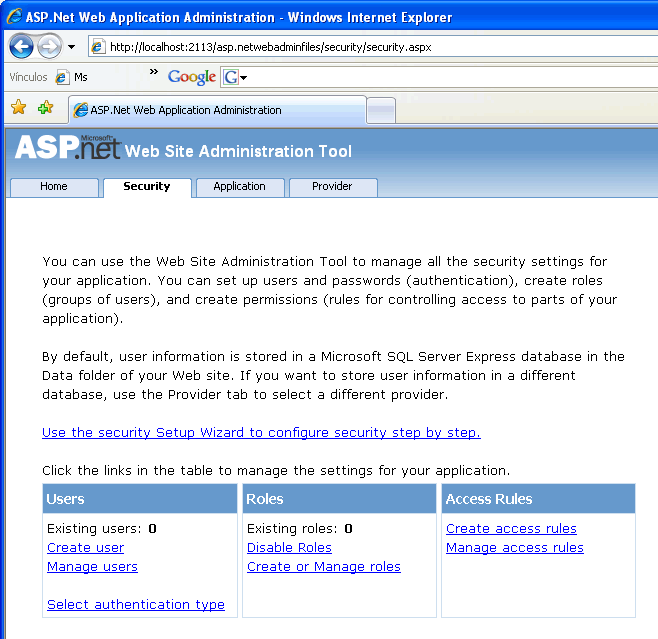
Ya no explico cómo usar esta herramienta porque es muy sencilla.
Si estás trabajando en un servidor local y creaste algunos roles y usuarios, y tienes que subir esa información al servidor con algún programa de sincronización de bases de datos, hazlo en este orden para evitar errores de integridad referencial:
La siguiente tabla no debe ser sincronizada porque el procedimiento de aspnet_regsql rellena la información necesaria:
aspnet_SchemaVersions
Primera pasada:
aspnet_Applications
Segunda pasada:
aspnet_Users
Tercera pasada:
aspnet_Membership
Cuarta pasada:
aspnet_Roles
Quinta pasada:
aspnet_UsersInRoles
¡Suerte!